Start here
Editing and styles
Media and content
Tutorials
Site and publishing
Layout and navigation
Forms and services
Use Sitely’s privacy support to display a consent banner, manage when supported third-party content activates, and provide access to your privacy policy.
Open Site Settings > Privacy and choose Enable privacy support. Sitely creates a Privacy Policy page and a banner. Write a policy that describes your actual site and services, or link to the policy you maintain elsewhere. Enabling the feature does not generate the legal text for you.
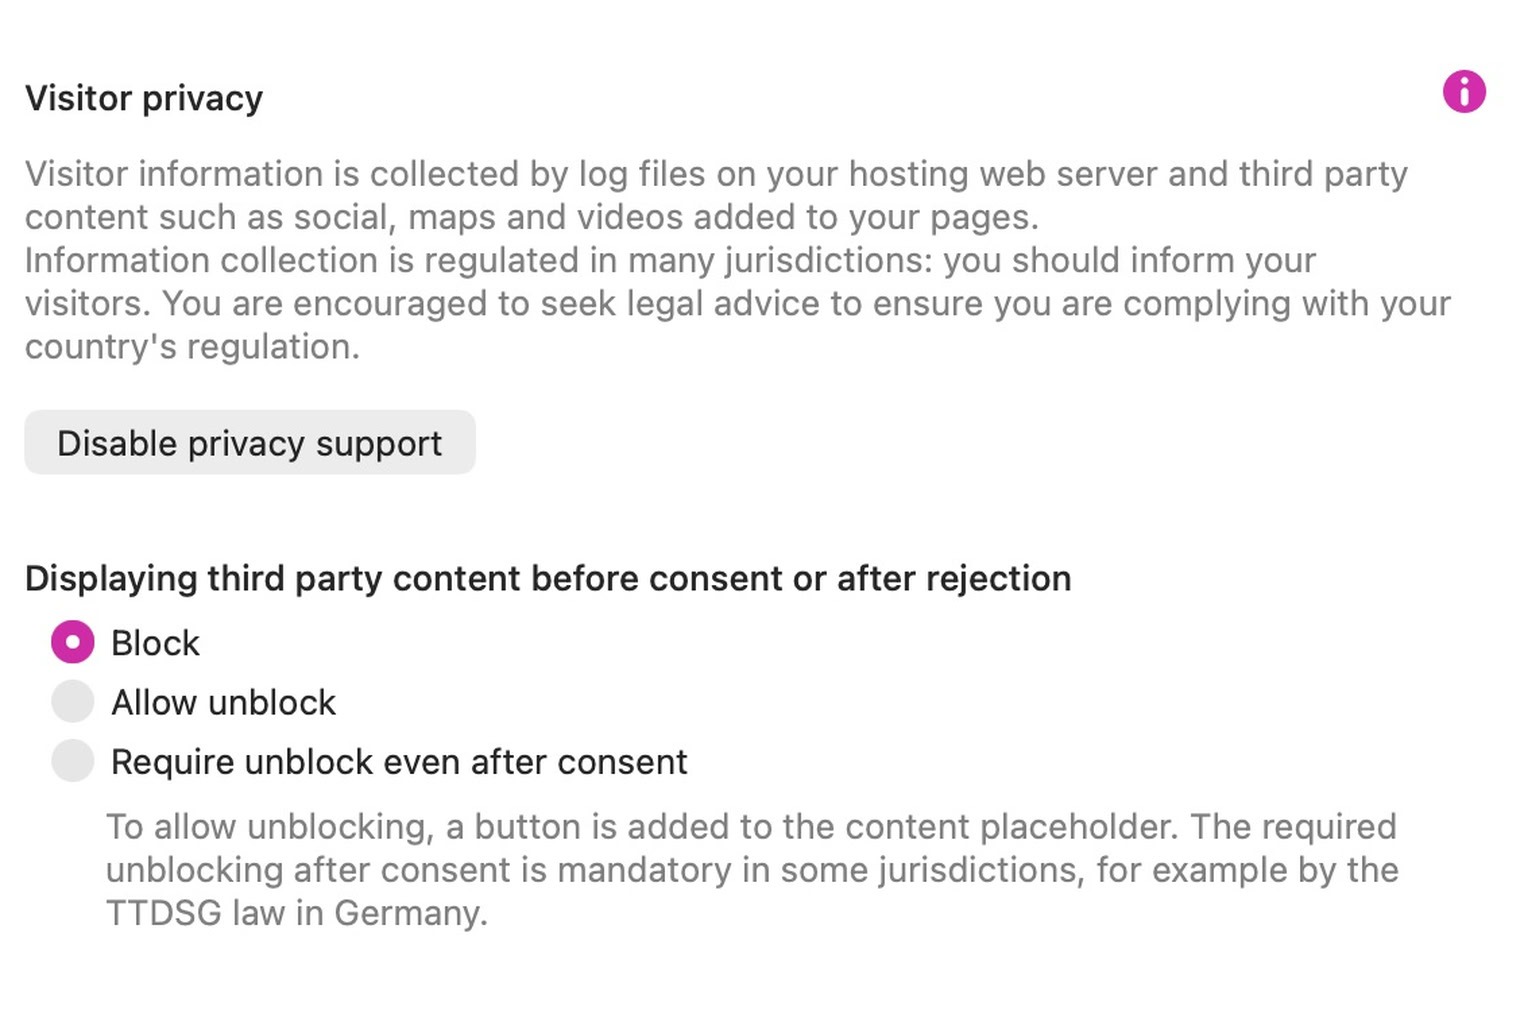
Open the Privacy Policy page and select the banner to edit its text, buttons, position and background. Keep the choices readable and the policy link easy to find. Choose Top or Bottom in the Privacy Banner inspector; the published banner is displayed on the site’s pages according to the visitor’s stored choice.
Opt-in waits for an explicit acceptance action. Opt-out also treats clicks on ordinary page links as acceptance. These workflows are different: choose the one appropriate to your site and applicable requirements.
The inspector also offers Accept on scroll or Dismiss on scroll, depending on the mode. Scrolling is not a clear affirmative action for GDPR consent. Where consent is required, do not use scrolling or ordinary navigation as a substitute for an explicit choice.
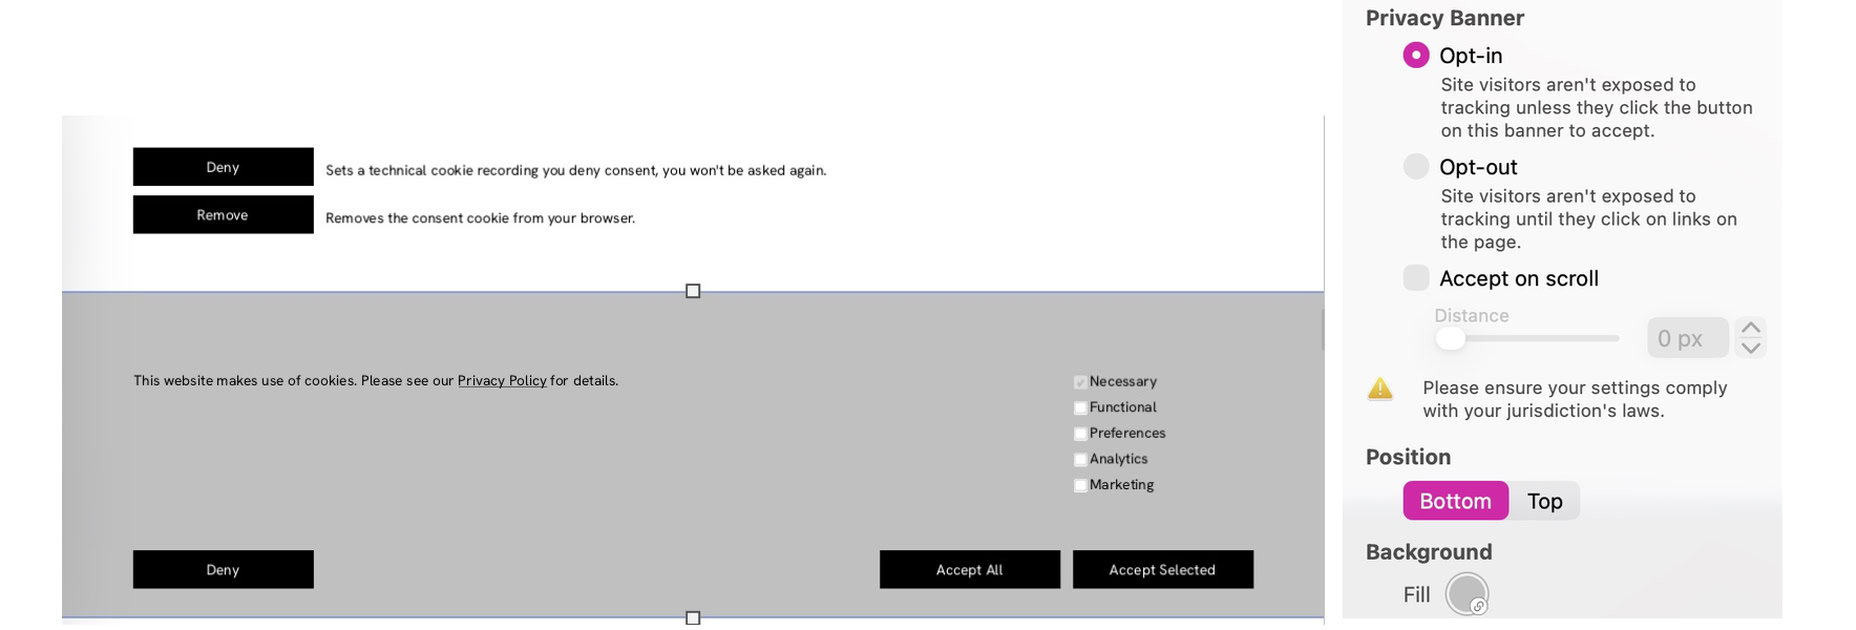
In Site Settings > Privacy, review Displaying third party content before consent or after rejection. Block keeps content blocked while the required consent is absent. Allow unblock adds an activation control to supported placeholders. Require unblock even after consent keeps a separate provider-activation step, including after banner acceptance.
Inspect the placeholder on each map, video or other supported element. Name the provider, explain what activation does, and keep the activation button and message readable. Activating a provider can also unblock other elements from that provider; test the scope on your page. For Embed elements, review Activate Immediately, Activate After Consent and Allow unblock deliberately; code that runs immediately is not delayed by the banner.
The site builder alone does not determine your privacy obligations. Review hosting logs, analytics, forms, payments, embedded services and any custom code. Document the services you use and the information visitors provide.
For a contact form, explain how submitted details will be used and provide the relevant privacy information. Whether consent is the appropriate basis, and whether proof must be retained, depends on the processing involved.
For guidance on valid consent and withdrawal, consult the EDPB’s consent guidelines and the rules applicable to your audience.
Keep the banner’s accept, deny and policy actions intact when restyling its controls. Deny records a refusal; Remove Consent clears the stored choice so it can be made again. A button with Privacy: open cookie banner lets visitors reopen the banner from an accessible place.
Review any cookie-category controls against the services they actually govern. A label such as Analytics does not by itself stop a script loaded elsewhere.
On a multilingual site, open the Privacy Policy page and choose Page > Localized Versions > Add Localized Version. Set the new page’s language and translate the policy text, banner, consent buttons and policy link. The version starts as a copy of the original words. The same command creates linked language versions of Search and Login pages. Preview every language and verify its banner and policy destination. See Site Settings for language setup.
Use Preview’s privacy options to inspect the banner and placeholders, then test the exported site in a fresh browser session. Try acceptance, denial, reopening the banner and individual activation. Check that a rejected widget stays blocked until the intended action, and that its explanation remains understandable.
Use the browser’s network tools to check when providers load. Custom scripts added to the page head or site-wide code can execute before Sitely’s consent controls; review those integrations separately. Repeat the check after adding a provider or changing the banner.
See Developer Options for code placement, Forms for submission setup, and Video and Maps for provider-specific controls.
Select an individual button in the cookie banner and use a compatible Button preset in Style. To save its appearance for another button, choose Save Preset. Applying a preset keeps the button’s consent action.
Please report any shortcoming in this documentation and we’ll fix it as soon as possible!
Updated for Sitely 8

Powerful and refreshingly simple, at home on Mac, finding new freedom on iPad.
This website makes use of cookies.
Please see our privacy policy for details.